Cabinet Refinishing Sacramento is a popular kitchen renovation method that is cost-effective and environmentally friendly compared to replacing cabinets. However, proper preparation is crucial for a successful transformation.
Unlike refacing and resurfacing, cabinet refinishing does not involve applying wood veneer to cabinet boxes. Instead, it focuses on refreshing the cabinet doors and drawer fronts.
Sanding
You’ve added a splash of color to your walls and upgraded your appliances, but your kitchen cabinets still look drab. If you’re not ready to commit to a full renovation, cabinet refinishing can provide a facelift for your entire kitchen. Before you get started, though, it’s important to assess your cabinets and determine what you want from your new finish.
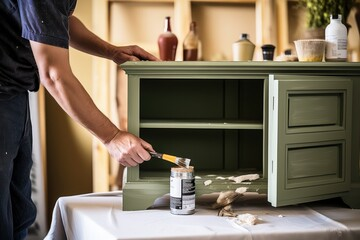
Choosing a paint color, style, and texture will give your cabinets a fresh look that will boost your home’s value. But before you can apply the paint, the cabinets must be sanded down to create a smooth surface that can hold the paint and avoid chips or uneven spots. This process is critical for a successful outcome and requires professional skills.
Before you start sanding, you’ll need to remove all of your cabinet doors and drawer fronts. Label each one clearly and set them aside for easy reassembly later on. You’ll also need to remove any hardware, such as knobs or handles, from the cabinetry and place them in baggies for safekeeping. You’ll also need to protect the interiors of your cabinet boxes with plastic and tape, covering backsplashes and sealing off appliances if necessary.
When you’re sanding, always use a medium-grit sanding sponge or an orbital sander to scuff the existing finish and prep it for a fresh coat of paint. You can also purchase a degreaser to clean the surfaces and make sure they’re free from grease and gunk, which will affect the final result. After you’ve finished sanding, vacuum and wipe down the cabinets to remove any leftover dust particles. If you’re doing the work yourself, it’s important to wear a mask and eye protection to avoid inhaling any of the dust.
Cleaning
The refinishing process for kitchen cabinets is a great way to refresh your cabinetry without the time commitment of a complete kitchen renovation. It can be completed within a few days and is typically less expensive than installing new cabinets. Plus, refinishing your existing cabinets is environmentally friendly. It avoids adding more waste to landfills and conserves resources.
Once your cabinets are refinished, they will need regular maintenance to keep them looking their best. A simple wipe down with a damp cloth is all it takes to remove everyday spills and splatters, prevent stains and avoid moisture damage. Be sure to dry the surface completely after cleaning, as moisture can cause wood fibers to shrink and warp over time.
When it comes to cleaning your cabinets, be sure to use mild cleaners and nonabrasive brushes or sponges. Avoid using harsh detergents or scouring pads, as these can scratch or dull the finish on your cabinetry. Instead, opt for a nondetergent, nonabrasive formula. It is also a good idea to rinse your cabinets with warm water rather than cold or room-temperature water. This will help the soap or cleaner evaporate faster, minimizing the chance of moisture damage.
It is also important to clean and dry any hardware like knobs and pulls regularly as well. Use a mild cleanser or dish soap and warm water, and gently scrub the surfaces. Be sure to dry them thoroughly, as moisture can damage metal hardware over time. You can also protect your hardware by choosing finishes that match or complement the look of your cabinets. For example, brushed nickel or pewter can create an elegant look, while brass or copper can work well with more traditional style cabinets.
Primer
Cabinet refinishing is an effective way to revitalize your kitchen without the expense of a full renovation. The process involves sanding, priming and then applying new coats of paint or stain. It’s an environmentally friendly option that saves time, money and waste compared to replacement. But, in order for the finish to last and look professional, you must choose the right primer.
A good primer will ensure proper adhesion, block stains and create a smooth surface. There are many options available, but choosing the right one will depend on the needs of your project. For example, if you’re changing the color of your cabinets, you’ll need a high-hiding primer. Fresh Start from KILZ has the ability to hide even dark colors, and it’s formulated with low VOCs. This primer is a favorite of professional painters and is easy to apply with a brush or roller.
To prepare your cabinets for painting, remove all hardware and clean the surfaces with a trisodium phosphate cleaner (TSP). Wipe down the entire cabinet surface, including the insides of the doors, to make sure everything is ready for the new finish. During this step, it’s important to label all the door and drawer fronts so they can be reinstalled in the correct place.
It’s also a good idea to re-key the locks, so you don’t have to worry about losing the key. Finally, you should test a few spots of your chosen primer on a small section of your cabinet before applying it to the rest of the surfaces. You may need to do some fine tuning to get the perfect match. Ultimately, it’s crucial to use a high-quality primer such as Advance from Benjamin Moore. It’s durable, resists stains and dries quickly, with no smell at all.
Paint
Cabinets are a big part of your kitchen, so it’s no surprise that they can get worn down over time. A cabinet refinishing process breathes new life into your cabinets, and it’s an economical and environmentally friendly alternative to replacing them.
Before you can start painting, be sure to clean all the surfaces. This includes the hardware, hinges, and drawer runners. Make sure to also address any scratches or dents. If these aren’t repaired before the paint job, they can show up later.
Next, you’ll need to sand the surfaces again. This time, you’ll use a fine-grit sandpaper to smooth everything down and remove any remaining rough spots. Once again, be sure to remove the dust from all the sanded surfaces with a tack cloth.
Once your surfaces are smooth, prime them again with the same product you used for priming. Once that’s dry, you can apply your first coat of cabinet paint. You’ll want to allow this to dry completely before you apply a second coat.
When it comes to painting, the type of product you choose is critical. Look for low-VOC products that will hold up to humidity, food grease, and other daily wear and tear. Also, be sure to follow the manufacturer’s instructions for proper application.
Assembly
Assembled cabinets are a game-changer in kitchen remodels. Instead of arriving as flat-packed boxes of parts that you or your contractor must piece together, assembled cabinets arrive as complete cabinet boxes ready to be placed and installed. This convenience cuts days off the installation process and gets you closer to your new kitchen much faster.
When assembling your cabinets, make sure to carefully open each box and lay out the pieces before you start working. Label each part and keep the assembly instructions handy so that you can refer to them throughout the process. Ensure that your workspace is clean and organized and that you have plenty of space for the entire project. If possible, work with a friend or partner to minimize stress and make the job go more smoothly.
Begin by laying out and dry-fitting your base cabinet box, positioning it according to the dimensions of your room and the layout of your design. Once you’re satisfied, use C-clamps to secure the cabinet box and insert wood shims as needed to ensure it is level and flush with the wall.
Next, install the cabinet doors using hinges provided in your kit. Before installing each door, be sure to double-check the alignment of the hinges and the hinge plate with the cabinet frame to avoid any issues later. Remember to regularly clean your workspace to prevent dust buildup and keep screws and glue accessible for easy reassembly.
Once the doors are installed, it’s time to reattach any drawer hardware and install shelves. Be sure to use a drill with a countersink bit so that the screws don’t protrude from the side of the cabinet. After reattaching all of the hardware, wipe down your cabinets and inspect them for any remaining fingerprints or marks that may need further cleaning.